If you work from home, your desk is probably doing double duty as a catch-all surface. Chargers, sticky notes, half-empty water bottles, the cable for a device you plugged in three weeks ago and never unplugged. Most people live with it because fixing it feels like a whole project. It is not. The real problem is that your desk has no anchor point. Once you add one, everything else has a place to go. A monitor stand riser is that anchor. When you raise your screen, you free up surface space underneath it, add hidden storage with a drawer, and suddenly the rest of the desk has logic to it.
I have done this on three different desks now, from a small 48-inch IKEA table to a deeper L-shaped setup. The process is the same every time. This guide walks you through it step by step, so you can go from cluttered and frustrating to clean and functional in one afternoon.
The riser I use for this system: WALI Monitor Stand Riser with drawer and dual pen holders
Rated 4.7 stars with over 15,000 reviews on Amazon. The built-in drawer and pen holders do a surprising amount of heavy lifting when it comes to desk organization. It is the specific piece I built this system around.
Amazon Check Today's Price on Amazon →Step 1: Clear the Desk Completely and Start With a Blank Surface
This step feels annoying but it is non-negotiable. Take everything off the desk. Every cable, every sticky note pad, every random item that has found a home on the surface over the past few months. Put it all in a box or on the floor temporarily. You need to see the actual desk surface before you can make decisions about what belongs there.
While the desk is clear, wipe it down. Cable residue and dust build up in spots you never notice when stuff is in the way. Starting clean also makes the next steps easier because you are placing things intentionally rather than working around what is already there.
Separate what came off the desk into three groups: things you use every single day, things you use occasionally, and things you do not actually need at your desk at all. The third group goes into a drawer somewhere else or in the trash. The second group will go into the riser drawer. The first group lives on the desk surface.

Step 2: Position the Monitor Riser and Lock In Your Screen Height
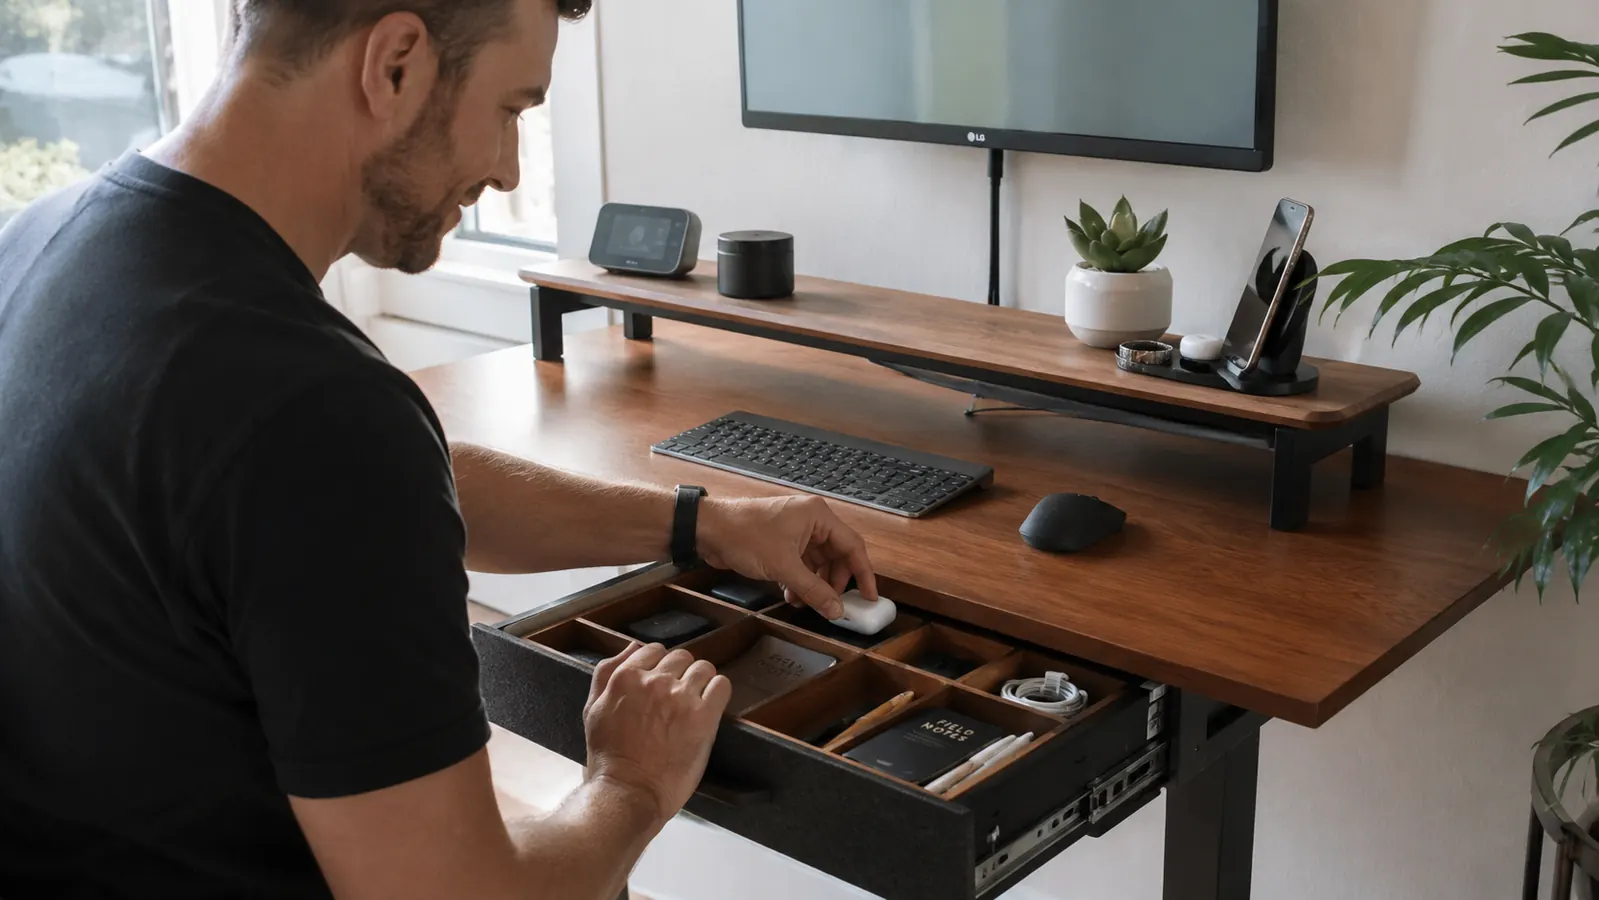
Set the WALI monitor stand riser in the center-rear of your desk. The standard placement is roughly 18 to 24 inches back from your seated eye level, which puts your screen at the right focal distance. The riser raises your monitor about five inches, which for most people with a standard desk chair brings the top of the screen close to eye level. You want the top third of your screen roughly at or just below your eye line when you are sitting normally, not leaning forward.
Place your monitor on top of the riser. Do not rush to slide the keyboard and mouse into position yet. First confirm the screen height feels right from your usual sitting posture. Slouched-at-the-end-of-the-day posture does not count. Sit up naturally and check where your eyes land. If the screen still feels too low, you can add a monitor arm instead, but for most standard desks the WALI riser is enough and costs a fraction of the price.
The pen holders on the sides of the riser are small but useful. If you default to dropping pens on the desk surface, put them here instead. Two pens and a stylus fit comfortably in each holder. Having them vertical and off the flat surface is one of those small changes that makes the desk look notably cleaner.
Step 3: Use the Under-Riser Space and Built-In Drawer to Handle the Daily Clutter
This is where the monitor riser earns its keep as an organizer and not just a screen raiser. The space underneath the riser platform is enough to slide your keyboard completely out of the way when you are not typing. If you use a full-size keyboard, measure first. The WALI riser has roughly 5.5 inches of vertical clearance and 23 inches of horizontal clearance, which handles most standard keyboards and the slim Bluetooth variety easily.
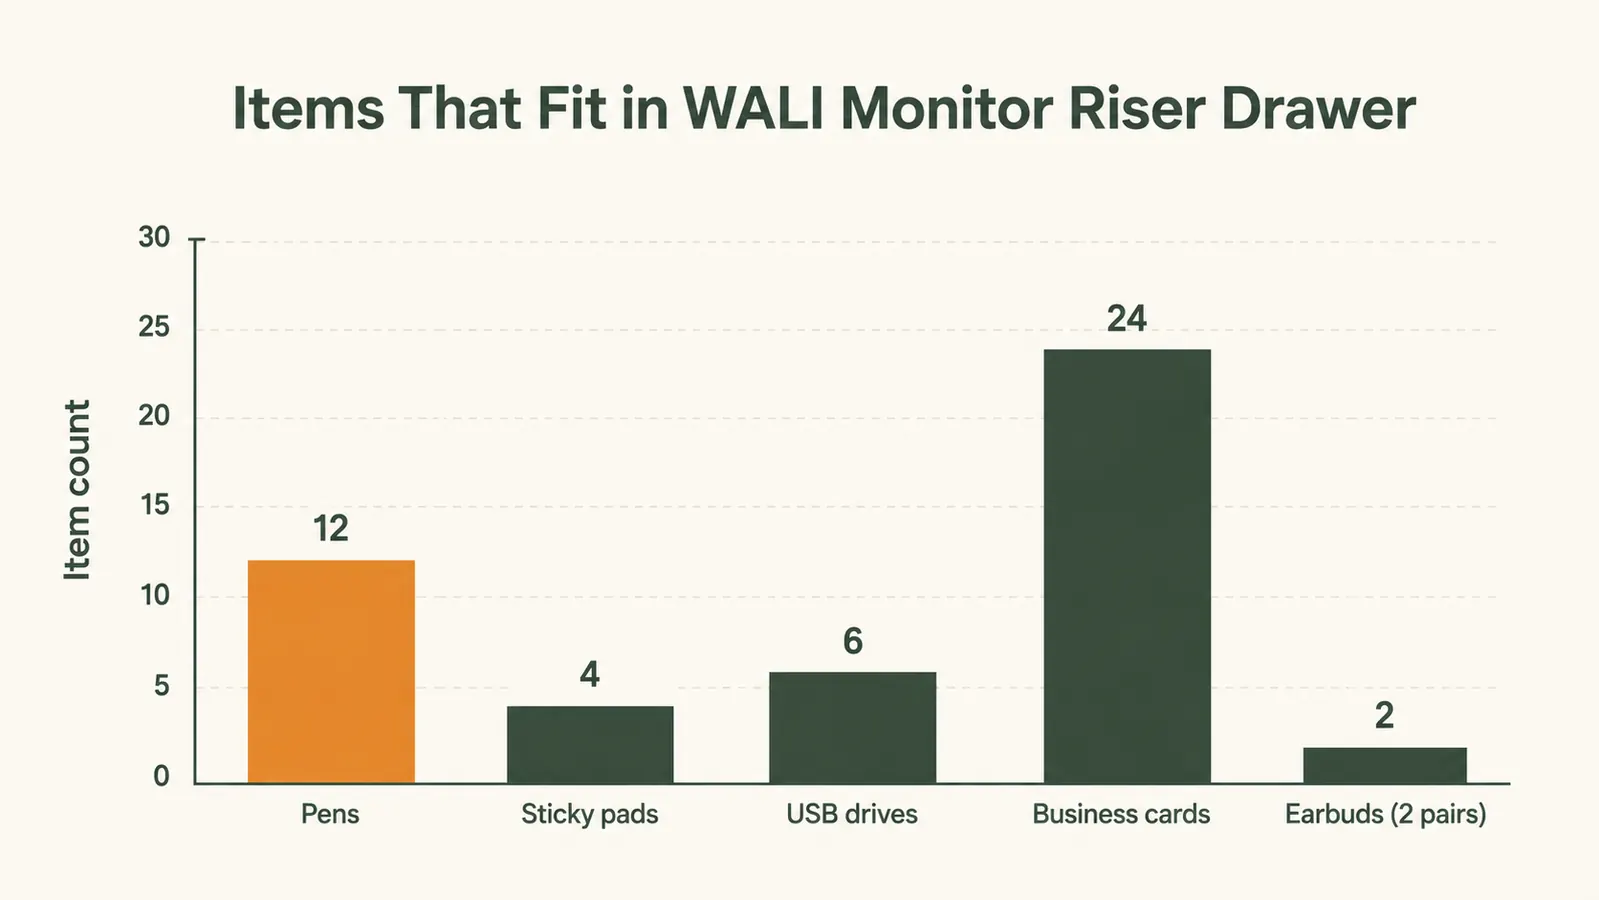
The built-in drawer is about 17 inches wide and 7 inches deep. It is shallow, which is actually a feature rather than a bug. Shallow drawers force you to be intentional. This is not a junk drawer. Treat it as your everyday essentials drawer: charging cable for your phone, a USB stick, a pair of earbuds, a notepad, and maybe a few business cards. Things you reach for daily but do not need on the open desk surface.
If you have a small external hard drive or a USB hub, this drawer is also a good home for it. The cable comes out the back and routes to your monitor or laptop without creating a mess on top of the desk. It keeps the surface clean without forcing you to unplug things constantly.
The built-in drawer is not a junk drawer. Treat it as your everyday essentials drawer and you will reach into it dozens of times a day without thinking about it.

Step 4: Route Your Cables and Define the Surface Zones
Cables are the reason most desks look messy even after you try to organize them. The monitor riser helps here too. Run the monitor cable, power cable, and any USB connections down the back of the riser and along the back edge of the desk, then down the desk leg to a power strip sitting on the floor or mounted under the desk. Use velcro cable ties every 12 inches to keep the bundle together. A single velcro strip costs about a dollar and the difference it makes is enormous.
With the cables managed and the riser in place, your desk surface now has clear zones. The rear zone is the riser and monitor. The mid zone in front of the riser is where your keyboard and mouse live when you are actively using them. The left or right zone, whichever matches your dominant hand for non-keyboard tasks, is your active work zone: a notepad, your coffee mug, or whatever you pull out during calls. Everything else stays off the surface.
If you have a laptop setup rather than a desktop monitor, the riser still works. Place the laptop on the riser platform to bring the screen up to eye level, connect a separate keyboard and mouse, and run the laptop cable through the same rear-edge cable channel. The open drawer and pen holders still function exactly the same way.
Step 5: Set a Five-Minute End-of-Day Reset Habit
The physical setup is only half the system. The other half is a reset habit. Without one, a desk returns to chaos in about four working days. The habit does not need to be complicated. At the end of each workday, spend five minutes putting everything back in its zone. Keyboard under the riser or back in position. Pens in the holders. Notepad closed and placed in the left zone. Anything that does not belong on the desk surface goes into the drawer or off the desk entirely.
This works because the riser system gives each item a specific home. When things have homes, resetting is fast. You are not deciding where things go, you are just returning them. The drawer closes and the desk looks clean. Five minutes at most. Pair it with shutting down your computer and it becomes automatic within two weeks.
If you find the reset slipping, the culprit is usually one of two things: either there are too many items living on the desk that do not have designated spots, or the drawer is overloaded with things that should live elsewhere. Go back to your three-group sort from Step 1 and be more ruthless about what actually belongs at the desk.
What Else Helps Complete the System
The monitor riser handles the center of the desk. For the rest of the surface, a few low-cost additions round out the system. A small cable box or cable sleeve under the desk catches any remaining loose cables that cannot be routed along the desk edge. A single monitor stand desk lamp, positioned to the left if you are right-handed, removes the need for a freestanding lamp that takes up surface space. Headphones on a hook mounted to the side of the desk keep them off the surface without needing a separate stand. None of these are expensive. Together they reinforce the zone system the riser creates.
The other thing that helps is resisting the urge to add storage just because you have the space. More storage often means more junk. The WALI riser's drawer has a deliberate size limit. Work with it rather than around it. If the drawer is full, the answer is not to add more storage, it is to pull out what does not belong there.
For a deeper look at what the WALI riser does as a standalone product, including how the build quality holds up over time and whether the drawer mechanism stays smooth, see the full WALI Monitor Stand Riser review. And if you want to see all the ways a riser like this goes beyond just raising your screen, the 10 ways a monitor riser organizes your desk article breaks down each one with practical examples.
Ready to build this system? The WALI riser is the piece everything else anchors to.
It is a 4.7-star riser with over 15,000 verified Amazon reviews and it comes in at under $20. The drawer, the pen holders, and the keyboard clearance make it the best single upgrade for a cluttered home office desk. Check the current price before you start shopping around.
Amazon Check Today's Price on Amazon →